

Making your own brushes
Tuesday, August 7, 2007
Lots of talk on the message boards about protecting your images online and so I thought I'd share with you a tutorial I did last month for the TTS newsletter on making your own simple copyright brush in photoshop.
1 - First open a new document. Transparent background is important for this.
1 - First open a new document. Transparent background is important for this.

2. Using the font of your choice write the year and your name, then we'll add the (c)

3. Wonderful thing about photoshop is the pre-set shapes. Using the shape tool, choose the copyright symbol and draw the symbol infront on your text.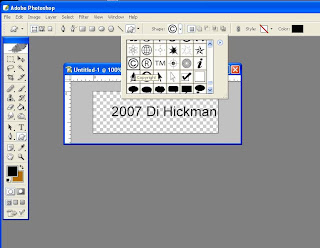 4. Next we'll save the brush, to do this select the area you wish the brush to be. Do this with the selection tool. You will get a box around the area with marching ants. Then go to: Edit>Define brush preset
 4. Next we'll save the brush, to do this select the area you wish the brush to be. Do this with the selection tool. You will get a box around the area with marching ants. Then go to: Edit>Define brush preset
5. Then you will get a pop-up box asking you to name your brush, I called mine what it was: "copyright Di Hickman"

6. Once the brush is saved you will be able to use in it the current brush palette. If you scroll down it will be on the bottom of the palette. You can now use this on all your images in any color you wish.


However if you change your brush palette you will lose the brush so I suggest you save the palette. You do this by going to your brush palette>save brushes. I save mine as copyright. Now whenever I need to copyright a bunch of photo's I can just open that palette set to get my brush!

 I always apply my brush to a new layer so I can change the opacity of it.
 Hope this helps!


6 comments:
COOOL love how you did the tutorial!! ONE DAY.... some day!!! YOU ROCK SISTA!!!
Do I have to use this in photshop? I usually remove my card stuff to Microsoft something or other because I am not editing them. HOw would I use a copyright in a simpler program or do i need to fold them back into a photshop folder and add it there and then back to the simple one? I know I have has a couple ideas stolen but so far it hasnt upset me much. One case gave me credit too.
Have been meaning to get around to doing this with my photies, so is a big help, thanks!!
Very nice. I have an exstensive tutorial, but I always like seeing others contributing to the digiworld. I am submitting this to the blog carnival.
That's a handy tutorial Di. Thanks a lot.
you're a gem Di, thanks for this tut
Post a Comment