Earth Day - Green Tutorial
Tuesday, April 22, 2008
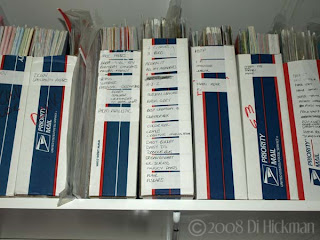
I've been scrapbooking since 2003. Back when I first started I didn't care what paper I bought, if it was cheap I bought it. I had no idea what my personal style was, or that such a thing as being published was possible for regular people. Anyway, when I did discover publishing, being on DTs etc. I quickly became aware that I needed a better storage solution. I'd read about the vertical storage of the cropper hoppers etc but honestly spending $$ on a storage solution was $$ that I'd rather spend on my paper (and thus adding to the problem!). So I came up with this:
Thrifty Vertical Paper Storage
 Materials:
- Used USPS Priority Mail Box
- 12x12 sheet of patterned paper
- Utility Knife
- Marker Pen
Step 2. Lay the sheet of paper on the box and draw a line. Doesn't have to be exact, just a guideline of where the TOP of the box needs to be. You could use a ruler at this point, but I am so not into measuring!


This system works for me. Initially I used the priority boxes as a "use what you have" storage solution. But I actually prefer it now. Afterall at $6.99 for ONE brand name plastic storage unit, I estimate that I have saved more than $80!!! (yes incase you are doing the math I have TWELVE of these right now!), and more importantly saved the environment!
Do I wish I had one of those showcase scraprooms, with matching furniture and all pretty and organized? Sure, that'd be nice. But right now, this works plenty fine thanks! :)
More soon
hugs
Di


4 comments:
I Love It...being new to scrappin...this will save big bucks....I also use my packageing you show on the ribbon ring...Thanks for Sharing your Idea's...It helps
GREAT idea!! Love it.
Thanks for the blog post Di! I had removed my orginal comment already, after noticing the USED requirement....my heart just stopped beating when I saw pics of the USPS boxes!
It's a great GREEN IDEA BTW!!
Post a Comment