Card Sketch April #5

Wednesday, April 30, 2008

The last day of April! I am so ready to start a new month. This weeks card sketch is below. Lots of room to make it your own and go with the flow (like I did). The digital template is available free in my store for a LIMITED TIME! Grab it while you can!


I opted for creative license this week as I changed the sketch a bit. Instead of squares I decided on 2 strips of paper. The patterned paper was too busy for the squares really. Also I did some penwork around the edge to finish off the card. Used the new white pen from Ranger, awesome pen!

"Friendship" card by Di Hickman
Supplies: Cardstock: DCWV; Papers: Around the Block; Brad: Making Memories; Ribbon: Target; Pen: Ranger; Flower: Prima;


"Embrace Happiness" card by Natalie Dever
Supplies: Cardstock: Bazzill; Patterned Paper: Basic Grey; Stamps: Papertrey Ink; Ink: Versafine; Bling: unknown


"Happy birthday" card by Wendy McGlinchey
Supplies: DCWV patterned paper, white organza ribbon, Copper satin card, blue satin card, white card, Flora Doodle fabric flowers, Versafine Sepia ink, Birthday greeting stamp, blue gems.


"Thanks" card by Chrys Rose
Supplies: Bazzill cardstock; Collage Press pattern paper; Scenic Route pattern paper; My Sentiments Exactly rub on;


"Happy Anniversary" card by Karen Leahy
Supplies: Blonde Moments paper; White card; Banana Frog anniversary wording; Making Memories ribbon and Brad; Film strip by Michelle Powell (www.divinedigital.com); Photos from the past 22 years


"Love Bug" card by Kim Hughes
Supplies: Patterned Paper;Graphic 45 and My Mind's Eye, Stamps; Cornish Heritage Farms, Ink; Clearsnap and Stazon, Colored Pencils; Prismacolor, Acrylic; Heidi Swapp


"thinking of you" card by Jan Tatomir
Supplies: Paper, Epoxy & Tag: SEi; Brad: Making Memories; Ink: ColorBox, Versamark; Other: machine stitching


"Congratulations" card by Kelli Smith
Supplies: stampin up pattern paper, prima flowers, ribbon, ranger stickles, brads


"Give thanks" card by Raechelle Bellus
supplies- pp: Scenic Route; DMC Floss; felt flower: Fancy Pants Designs; rubons: Making Memories; tag and ribbon unknown; ink: Ranger


"Happy Birthday Wishes" card by Lynn Anne Cutler
Supplies: Stickers by Karen Foster Design; cardstock by Paper Studio; adhesive by Tombo; cardboard scrap


"Happy Birthday" card by Annette Taylor
Supplies: Basic Grey Phoebe Patterned paper, (Cuttlebugged) Cardstock was a RAK, Ribbon, ink and bling from Angel Crafts May Ribbon kit, Green felt flower from American Crafts, Rubber stamps – Kim Hughes at CHF


"Congratulations" card by Jo Willis
supplies- Papermill card, DCWV cardstock, Dovecraft retro floral paper, Congratulations sticker (free with Papercrafts magazine), Prima flower, DCWV brad and a black Sakura Micron pen.


"Celebrate" card by Linda Flinders


"Love" card by Amanda Cruxton
Supplies: Papermill cardstock base, DCWV cardstock, Cuttlebug Heart blocks embossing folder, Papermania Vintage shapes caddy, brown velvet ribbon paperchase, Rub on letters from stash. sentiment panel made using Debbi Moore Metallic Magic & Docrafts rubber stamp. All distressing courtesy of Tim Holtz Walnut Ink pad and a nail file


"Calling cards" by Beverley Todd
Supplies: Cardstock, rub ons: Luxe Designs; Stamps: Making Memories; Assorted pink, black & red markers & fine liners & a Spica clear glitter pen.


"thinking of you" by Ruth Trice
Supplies: PP by Basic Grey, Brenda Walton and others. Stamp by Rubber Stampede, flowers by Prima.


As usual hook me up in the comments as I love to come check out your cards!

Hugs

Di

Read more...

Tutorial Tues - Stretching supplies

Tuesday, April 29, 2008

With gas approaching $4.00 here in Southern California, and high in other parts of the US, I think we're all feeling the need to penny pinch. So I guess these GREEN tutorials came at the right time huh? This is the third in the series of recycling, reusing and re-purposing our scrap supplies.

Stretching Supplies to save $$

This week I thought I'd mention how I save a few pennies by using the contact sheets that come with paper packs. These come with all paper kits, or packs. A contact sheet is just the front sheet of the pack, that has miniature versions of the sheets of patterned patterned paper printed on it (many manufacturers do this with their kits, Cosmo Cricket, Basic Grey etc). So rather than just throw them straight into the recycle, USE them!


All you need to do is take your paper trimmer, or ruler/craft knife and trim out the peices. Usually these are square but sometimes you'll get rectangles.


All you need to do then, is use them on a project. They work great for color blocked layouts, borders, or cards! Cards work especially well as the patterns are reduced so they can kinda get lost on a big area like a layout. I find this sketch works especially well, and this one too. As you can see below you can't tell its not the the 'real' paper.

Supplies: Papers: Cosmo Cricket; Stamp: Katie & Co; Ink: Clearsnap;

The rectangles under the birthday strip are all cut from the contact sheet squares! Just added So next time you go to put these sheets straight in the trash, cut out the squares and use them on a project!

Supplies: Cardstock: DCWV; Papers: Cosmo Cricket; Sentiment: Dymo label maker;

More soon

Di

Read more...

Freebie - WINNER (flowers)

Monday, April 28, 2008

Wow the flower freebies are really popular huh! lol!

Anyways I picked a winner, who will receive this glorious flower freebie.


And the winner is......

Sally. Love those flowers! Thanks for the chance to win!

Email me Sally and I'll get them in the mail to you!


More freebies every week!

hugs

Di

Read more...

Manufacturer Monday - Cosmo Cricket wk 3

Should be wk 4 but I missed a week with my hand being burnt. I was working with the Cosmo Cricket Cogsmo line which honestly, I am running out of steam with. I think I just need to put this away and move onto approaching deadlines. Once I get ahead with my upcoming assignments, I can probably play again.

This layout is a hybrid one. As soon As I saw this fun paper I had this layout in mind. The title "Fun has U right in the middle of it" is from the 12x12 striptease sheet, which has tons of fun titles. I just cut it to make it work for a 8.5 x 11 layout. I think it works well with this layout. The hybrid part is the journaling panel which I created in photoshop and printed. You can find my tutorial on white text here.

"Fun" hybrid layout
Supplies: Papers & Title: Cosmo Cricket; Dotlets: Making Memories; Font: Arial;


This is the last Monday of April so next month brings a new manufacturer. In my original (pre flu and burn) plans I had planned on Reminisce... BUT, I think I am going to chose another. Maybe one where I only have a few sheets left (like March's Acrtic Frog). Feeling the need to just get stuff done. Plus I need to get back into my organization mission in here!

More soon!

Di

Read more...

card - got spots?

Sunday, April 27, 2008

While I was ill with flu etc I realized one of the cards I don't do that often is get well soon type cards. So I did a couple, and this one I thought was kinda funny. I do love dots and dotted papers especially, so the sentiment was kinda apt. Would be good for those suffering with measles, or chicken pox etc.

All supplies one heart... one mind;

I'm busy working on projects right now, and making preparations for National Scrapbooking Day, which is just one week away, May 2nd! Lots of things happening all around the web, but I hope to link you up to to some fun stuff happening which I'll be involved in. You got any plans for NSD?

See you tomorrow, have a great Sunday!

Di

Read more...

Stamping Saturday - CHA project

Saturday, April 26, 2008

As most of you will know I attended the Winter CHA show in Anaheim earlier this year. One of the great things about the show is the make'n'takes. Which is basically little classes put on by manufacturers that you get to make, and take home with you. At my first CHA in 2007 I didn't do many, just a couple to get a welcome break from walking, lol. This year though I challenged myself to do ones that push me. That meant anything with techniques, cos you all know I am technique challenged (lack of patience isn't a good thing for techniques!). Anyway, one of the make'n'takes I did was this card at the Hero Arts booth.


No idea on the actual supplies other than Hero Arts stamps. I also did some stamping stuff at the Ranger booth but cannot find the darn keychain. That was with Hero Arts background stamps which were beautiful!

I guess you could say CHA was the catalyst of the themed days here on the blog. Once I'd done some stamping and techniques there, I knew I was hooked. Plus I thought about my drawers here, bursting with stamps and inks and knew it was time to learn some patience and USE these supplies! So expect stamping stuff to be popping up all over the blog!

More soon

Hugs

Di

Read more...

Friday Freebie - More flowers?

Friday, April 25, 2008

Seems like everyone likes the flower giveaways and I have rather a HUGE stash of flowers so here is another bundle. These are pinks, peach and a few grey flowers. All sizes from HUGE 4" across to tiny :) Sign into the comments for a chance to win.


Winner will be chosen at random on Monday!

Good Luck!


Di

Read more...

Theme Thursday - Anniversary Wk 4

Thursday, April 24, 2008

I think I am steadily getting a nice stash of Anniversary cards! Thankfully, because I always need these. I thought I'd take a break from the Kolette Hall stamp and dig through my stash. I knew I had another anniversary stamp somewhere and here it is. Old, very old, but it still works.

Supplies: Cardstock: DCWV; Paper: The paper company; lace paper: Miss Elizabeths; Ink: Tsukineko; Stamp PSX; Metallic Rub-n Cremes: Craf-T;

I finally used the last sheet of this blue/grey floral paper on the card and envelope above. It's one of those that looks lovely on the sheet, but tough to actually USE. I few of you commented about the lacy trim from my card last week, well it is actually die cut lace paper. I found this on small rolls at Dollartree ages ago. Self-adhesive too which is great! Plus it takes ink and chalks etc really well.

Supplies: Cardstock: DCWV; Paper: Anna Griffin (card), DCWV (envelope); lace paper: Miss Elizabeths; Ink: Clearsnap; Stamp PSX; Chalks: Craf-T; Ribbon: JoAnns;

As soon as I'd done this card and looked at it on screen I knew I should have used red inks etc. It looks ok, but would look better with the pops of red I think. Ah well, live and learn. Plus did you notice? Stamping, inking AND chalking on the same card!!! Sheesh!

More soon

Hugs

Di

Read more...

Card Sketch April #4

Wednesday, April 23, 2008

Am I the only one that's slightly worried about how fast this year is going? I mean it's almost the end of April for heavens sake!!! The year is nearly 1/3 over! Maybe it's because I've been "off" and it's just crept up on me? Anyway here is the card sketch for this week. As usual digital download in my store for a limited time.


Here is the last card made with my Paper Loft papers. They are pretty papers, especially love this graphic floral. The ribbon is just scraps, and the rub-ons I have had FOREVER. I don't even think PSX is around anymore? Anyone? lol! As you can see I opted for a sentiment rather than monogram.

"Friends" card by Di Hickman
Supplies: Cardstock: Georgia Pacific; Paper: Paper Loft; Ribbon: Offray; Rub-on: PSX (Duncan)

Before I get to the rest of the girls, just a quick update! Cindy and Jolene have stepped down from the team and I wish them well for the future! I won't be replacing them anytime soon, as I have the guest designers lined up till June, then I'll probably ask 1-2 of the guests to stay on for the rest of 2008. BIG CONGRATS to Kim who's card is missing this week as she got it picked up for publication. So look out for that in CARDS, September issue (and remember to look out for both Chrys and myself in July's CARDS featuring cards from my sketches!).


First up this week is Karen, one of the GDT for this month, and doing an awesome job too! Love the floral paper on top, just peeking out. Touch of ric rac and how she changed the bottom ribbon for a sentiment.

"Birthday Wishes" card by Karen Leahy
Supplies: K and Co papers and grand adhesions stickers, a Hot Off the Press birthday stamp and a chipboard monogram (make unknown) I also used some sparkly rikrak and a couple of punched flowers


Chrys rocked the sketch with some pretty papers and swirls! Love the touches of orange on this with the pale blue, really POPS!

"Lets get together" card by Chrys Rose
Supplies: Bazzill cardstock; Collage Press pattern paper; Art Warehouse rub ons; Scenic Route rub ons; Prima flower; Autumn leaves button


Elegant card from Jo, with soft colors, stitching and flowers. Love the beaded flower centers too!

"Thinking of You" card by Jo Willis
Supplies: Papermill card, DCWV Luxury Stack paper, HOTP paper (earth’s Palette), vintage image from Ebay CD, Making Memories ribbon, Heidi grace sentiment stamp ( from greetings set), Creative Beginnings silver embossing powder, DMC silver thread, Prima flowers and various beads.


Love this card by Annette, she really made it her own! The scallops work well with this design! With Kim's stamps too, you can't go wrong!

"Best Wishes" card by Annette Taylor
Supplies: Bazzill Cardstock, K&Co Wild Saffron Patterned Paper, Scenic Route chipboard letters, Creative CafĂ© felt, Robin’s Nest Dew Drops, Kim Hughes (CHF) Rubber Stamp, Colorbox inks and chalks


Jan made this BEAUTIFUL card this week, totally love it! The papers, colors and bracket edge work so well together.

"Happy Birthday" card by Jan Tatomir
Supplies: Paper: Making Memories; Cardstock: Bazzill; Letter: Doodlebug; Trim: K&Company; Rub: Crate; Ink: Ranger Distress Ink; Paint: Making Memories; Other: machine stitching


Love the colors Beverley chose this week. Interestingly I've been working with this color palette for a digital kit!

"Happy Birthday" card by Beverley Todd
Supplies: Cardstock: DCWV; Papers, velvet ribbon, die cuts: Making Memories (5th Avenue); Rub on words: HOTP; Ric rac: Bazzill Basics; Ink: Colorbox fluid chalk (lime pastel)


Fun card from Mandy, another of the guest designers for this week. I like the fun trim she chose and the digital sentiment.

"Laugh" card by Amanda Cruxton
Supplies: Papermill hammered cardstock base, HOTP paper, Papermania rub-on stitching, ribbon & brad, Prima flowers + sentiment is a digi download by R. Penn


Mum went bright and bold this week with her card. Love the papers by My Minds Eye (I should cos I bought them! lol)

"Happy Birthday" card by Linda Flinders


Fun, funky and fresh is how I'd describe Lynn Anne's card. Great color palette. And love the little touches of stitching!

"Wish" card by Lynn Anne Cutler
Supplies: Sticker by Pebbles,Inc.; Paper and cardstock by Paper Studio; adhesive by Tombo; cotton thread


Kristin took the sketch in a new direction this week, using it as inspiration then doing her own thing, which is A-OK! Again great color scheme, and I love the vellum! I bet we all have vellum in our stash somewhere!

"everyday" card by Kristin Schulz
Supplies: DCWV embossed card; Colorbox chalk inks; Scenic Route Patterned paper; Joann's vellum quote; Making Memories trim


Pearl's card is another one fresh and funky! Love the Elsie papers!!! Totally cool! the scallop edge gives it a fun feel too!

"Hi!" card by Pearl Liu
Supplies : Bazzill Scalloped CS, Love, Elsie -Claire Prom Dress , ribbon , Daisy D rub-on tape transfer, K&Co Die Cut Glitter Stickers


Natalie had fun with the sketch this week! Some bright papers, stamps and a fun sentiment really add up to a great card!

"Hey You Hoo" card by Natalie Dever
Supplies: Cardstock: Bazzill; Papers: Scenic Route, Pink Paislee; Stamps: Sassfrass Lass; Ink: CTMH; Other: buttons, machine stitching


I love this hybrid card by Raechelle. Nice vintage feel to it too. The monogram really pops

"R" card by Raechelle Bellus
supplies: smj designs Love Shack kit; buttons: foofala; twill; ink; Ranger


Wendy dove into the sketch and used embossed papers to highlight that this is a coming of age card. The red really pops on the black and white too!

"18th" card by Wendy McGlinchey
Supplies:- DCWV card and patterned paper, Cuttlebug Number Collage embossing folder, die cut numbers and letters, gold edged black satin ribbon, various paper flowers and Papermania stitching rub-ons.


"celebrate" card by Nancy Jones
Supplies: graphic 45 patterned paper; scenic route rub on; daisy d rub on stitches; doodlebug sugared brad; prima flower; bazzill cardstock


As usual hook me up in the comments if you do the sketch, as I love to come check them out! Hopefully catching up this week on comments too!

Read more...

Earth Day - Green Tutorial

Tuesday, April 22, 2008

If I had any clue how fast April was flying by I would have saved the initial GREEN tutorial for today but honestly I am feeling out of sorts lately. I have lost a whole month to flu and injuries, well really it's a little more than that but who's counting? (me). Anyway, today is Earth Day and as such I thought I'd bring another Green tutorial to the blog.

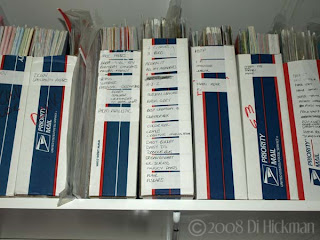
I've been scrapbooking since 2003. Back when I first started I didn't care what paper I bought, if it was cheap I bought it. I had no idea what my personal style was, or that such a thing as being published was possible for regular people. Anyway, when I did discover publishing, being on DTs etc. I quickly became aware that I needed a better storage solution. I'd read about the vertical storage of the cropper hoppers etc but honestly spending $$ on a storage solution was $$ that I'd rather spend on my paper (and thus adding to the problem!). So I came up with this:

Thrifty Vertical Paper Storage


Materials:
  • Used USPS Priority Mail Box
  • 12x12 sheet of patterned paper
  • Utility Knife
  • Marker Pen

Step 1. Save all your large priority mail boxes. Worth noting here that we are using USED boxes. Two reasons for this, 1) It's illegal to use the boxes for anything other than USPS mailing, and 2) Using new ones negates the whole point of the GREEN tutorial!!!

Step 2. Lay the sheet of paper on the box and draw a line. Doesn't have to be exact, just a guideline of where the TOP of the box needs to be. You could use a ruler at this point, but I am so not into measuring!


Step 3. Again you could get out the ruler but I just freehanded a diagonal line on one side. Flip the box over, and repeat. Ensuring the diagonal is on the same side! The take the utility knife and carefully cut through the box.


Step 4. You should end up with something like this, that you can store your papers in. Level on the top with the papers, and a slope opening at one side that you can flip through.


Step 5. Repeat with as many boxes as you have/need. As you can see mine aren't all the same depth on the diagonal cut but that's ok, the point is that this is TEMPORARY storage while I USE my stash!!! I used address labels to write on the paper manufacturers


Of course, you could pretty them up with patterned paper if you wanted, or use paints, stickers etc. Not sure if you can tell in the photo, but I also organized my paper alphabetically by manufacturer.

This system works for me. Initially I used the priority boxes as a "use what you have" storage solution. But I actually prefer it now. Afterall at $6.99 for ONE brand name plastic storage unit,
I estimate that I have saved more than $80!!! (yes incase you are doing the math I have TWELVE of these right now!), and more importantly saved the environment!

Do I wish I had one of those showcase scraprooms, with matching furniture and all pretty and organized? Sure, that'd be nice. But right now, this works plenty fine thanks! :)

More soon

hugs

Di

Read more...