Card Sketch October #5

Wednesday, October 31, 2007

Wednesday again, another card sketch. Busy with parents, off out doing stuff. I will get around to commenting on everyones blogs next week, promise. As usual hook me up and I'll come check them out (soon). And the digital template download is here.


Supplies: cardstock: DCWV; Patterned Paper: DCWV; Rub-ons: Scrap-ease; brads: Joanns

Supplies: Card kit from 2jills.com


Card by Jolene Johnson
Supplies: Bazzill cardstock, Die Cuts With a View Luxury paper, Offray ribbon, Deluxe Designs chipboard, JoAnn rub on, Making Memories paint, Stickles, StazOn ink


Card by Pearl Liu
Supply List : DCWV All Dressed up CS & epoxy sticker


Card by Jo Willis
Supplies: card (Papermill shop), Scenic Route papers, Studio G stamp, Brilliance ink, bookplate, MM brads, gems and a Sakura Micron pen.


Card by Wendy McGlinchey
Materials used:- White card stock, Patterned papers and Image from Joanna Sheen Victorian Christmas CD, Sizzix corner Die cut shape, Crystal Stickers Pearls, small length of lace, Tanda Stamps Music stamp. Silver Peel Off.


Card by Ruth Trice
Anna Griffin Stamp, PP by Anna Griffin and HOTP, plastic embellishment, flowers by Prima, Glitter glue and sparkly gelly pen by Sakura.


Card by Indah Permata Sari
Supply List: Miss Scarlet by Bette Duganitz @ DAISIE Company; Brushed Aluminum Style by Erica Hite @ ScrapGirls


Read more...

Reminisce Holiday cards pt5!

Tuesday, October 30, 2007

Come on stop sticking your head in the sand! The holiday season I wrote out all my England cards for Family and Friends back home, just got to do USA ones. Plus I like to have "extras". You know, for those people you always forget about, plus I like to have leftovers, as then I'm ahead of the game next year! Hurrah!

Again everything is created with my stash. Happy to report it IS shrinking. I may even use all this up someday! And that's just the Holiday stuff! I got a package from Treasures to Scrap last week that was full of product for the next 3 months sponsors, some great stuff that I can't wait to dig in and play with that, especially the scrapworks stuff!!! Did you see their new Holiday line? It rocks!!! Loving the glitter chipboard!


Supplies: Cardstock: DCWV; PP: Reminisce; Rub-on: DCWV; Tag: Target; Ribbon: unknown

Supplies: Cardstock: DCWV; PP: Reminisce; Rub-on: Joanns; Metal tree tag: Unknown; Ribbon: Unknown; Brad: MM

Ok just wanted to say that this one would NOT photograph right. The tag thing has a shimmer to it that wouldn't come out the right color. It's a pale green with red stitching around the edge. It doesn't look as out of place in RL as it does here in the pic!

Supplies: Cardstock: DCWV; PP: Reminisce; Rub-on: DCWV/Joanns; Tag: Target

Supplies: Cardstock: DCWV; PP: Reminisce; Mesh: Magic Mesh; Tag: Target

Supplies: Cardstock: DCWV; PP: Reminisce; Rub-on: Joanns; Tag: Target; Ribbon: Unknown

Supplies: Cardstock: DCWV; PP: Reminisce; Rub-on: Joanns; Tag: Target; Ribbon: Unknown

Supplies: Cardstock: DCWV; PP: Reminisce; Rub-on: DCWV; Tag: Colorbok; Tree buttons: Unknown

I hadn't really noticed till these green ones, but did you see the common theme with 80% of the cards I've made this month? Sanded edges! When did this start? I did sanding on one of the layouts for the October layout sketch, but most of the cards too? Sheesh. Technique phase anyone?

More creations coming soon! Off out to the beach today I think. The time with my parents is really going by fast. Mums ankle is healing, at least the bruising is going down and she's walking a little better. Booked a trip to the Griffith Observatory later this week too.

See you tomorrow for the weekly card sketch...

Read more...

White text... it's what we're NOT printing!

Monday, October 29, 2007

I thought I'd continue with the computer journaling theme and show you how to print in white! Now strictly speaking the whole printing in white is a misnomer as you actually print the area around the text or design not the text itself, because as yet no printers have white ink (and when they do I'll be first in line!). I already have the layout partially done and know that I want to print an area approximately half the size of a letter sheet of paper. In Photoshop I opened a new document 5.5" x 8.5". My journaling and title need to be on the right had side in an area 3.5" x 5.5" so I created a text box in that size on the right size of the paper by clicking the Text icon, then clicking and dragging a box in your document. Then we can add the text, altering the font and size as necessary to fill the area


As you can see the text is the default black, so lets work on the background we're going to print. For my layout I wanted a duckegg blue background to match the colors of my layout, so a filled the area with a blue using the paintbucket tool.


Now I could have left the blue as is, flat color, and printed it out. But the papers I was using for the layout were all distressed, so I opted to give the background a little depth by adding texture filter. In Photoshop: filter>texturizer> then choose filter of choice. I chose the Craquelure, and just played with the setting depth till I got a look I liked that resembled the texture on my other papers.


Our final step is to highlight all of the text and choose white as our font color. This sets all the text to white, then we can print onto high quality white paper. I print mine at high quality either on photo paper or high quality white inkjet paper.


Once printed, trim and assemble the layout using the printed sheet the same as you would a regular patterned paper or journaling block.

Supplies: Patterned Paper: My Minds Eye, Buttons: My Minds Eye, Transparancy: My Minds Eye, Brads: Doodlebug, Boxer scrapbooks, Photo Corners: Heidi Swapp, Photoshop: Fonts: Arial, Rosewood,


This tutorial is done in Photoshop but the steps are basically the same for all software. Type the text you require, make the background the color you want to be behind the white text, then select your font color to white! Its a simple trick, but sometimes white text and titles can be really effective on a layout!


Published in Scrapstreet Ezine August 2007
Images and Text: Copyright Di Hickman 2007

Read more...

Hybrid Halloween

Sunday, October 28, 2007

Lately I've been doing a few hybrid projects. This is one for a "Hybrid Halloween". Using the Shabby Princess Halloween papers (holiday sampler kit from her website). I printed out the digital paper then assembled everything traditionally.

Card Supplies: Paper: holiday sampler by Shabby Princess;
Journal panel, rub-ons & photo corner: one heart... one mind;
eyelets & ribbon: Boxer


This is a little treat cover. Just folded the printed cardstock, added the panel and stapled. Inside is a cellophane bag with treats. The 'bag' stands up on its own, nifty.

Supplies: Paper: holiday sampler by Shabby Princess;
Journal panel, button: one heart... one mind;


More projects coming soon!

Read more...

Reminisce Holiday cards pt4!

Saturday, October 27, 2007

If it's possible I have MORE Christmas cards to share! If you noticed I've been grouping them by patterned paper. All cards done with ONE sheet of 12x12 paper. I can get about 7 or 8 cards from a sheet. Everything again is from my stash. Some of the stuff I have no idea of the manufacturer as it's from, like the page pebbles, die cuts, and metal embellishments. Most of it is stuff I've 'collected' over the last couple of years. Yes I don't hoard, I collect! LOL! Oh and again some of these are based on sketches from the last month or so.

Supplies: Cardstock: DCWV; PP: Reminisce; Rub-on: Joanns; Tag: Target; Ribbon: Offray; Snowflake Die cuts: Unknown

Supplies: Cardstock: DCWV; PP: Reminisce; Tag: Target; Rub-on:DCWV; Ribbon: Offray;

Supplies: Cardstock: DCWV; PP: Reminisce; Rub-on: Joanns/DCWV; Ribbon: Offray; Snowflakes: Unknown

Supplies: Cardstock: DCWV; PP: Reminisce; Rub-on: Around the Block; Stickers: Joanns; Pen: Uniball Signo; Snowflake: Unknown

Supplies: Cardstock: DCWV; PP: Reminisce; Rub-on: Around the Block; Snowflakes: Unknown

Supplies: Cardstock: DCWV; PP: Reminisce; Sticker: Joanns; Snowflake: Unknown; tag: unknown;

Supplies: Cardstock: DCWV; PP: Reminisce; Rub-on: Cosmo Cricket; Pen: Uniball Signo; Rhinestone: Unknown

Supplies: Cardstock: DCWV; PP: Reminisce; Rub-on: DCWV; Snowflake: Unknown; Epoxy Pebble: Unknown

Bought some pre-made envelopes Thursday from Walmart so just need to fancy those up a little with decorative tape (I have a few of those) and maybe some rub-ons. Then I just need to write on the cards (not my favorite bit).

Read more...

Scrapbook dimensions has a blog!

Friday, October 26, 2007

Scrapbook dimensions has a blog! Who knew? I gotta say I was in the dark but found the link on the EDS blog. You can find a tutorial for these Halloween bag toppers there written by yours truly :) It was written for the EDS blog but they used it on the Magazine blog! Woohoo! Anyway here are the bag toppers.

Made with the Fiendish Friends kit from Treasures to Scrap, and some misc scrapping supplies (DCWV rub-ons and some misc stickers). They took minutes to make and are super easy! Take a look...

Read more...

Think before you print!

Thursday, October 25, 2007

Imagine the scene... You click, click, click with your digital camera, snapping photo after photo till you're satisfied you got a perfect shot (or two!). You go to download your photo's to the computer, adjusting the quality as need and then print. WAIT! STOP and THINK! It doesn't have to end there! You can do so much more! And this month I'm going to show you how!

If you're anything like me you have a vision of what the layout is going to look like as soon as you see the photo on your screen. Not ALL the details are planned out but I have an idea of colors, and theme I'm going to use. So why not take things one step further before you print those photo's! There are TONS of options out there in the digital world to jazz up those photo's adding a little pizazz to your page! In the example below I added a digital frame and some text. I enlarged the photo so it also serves as the title to my page!
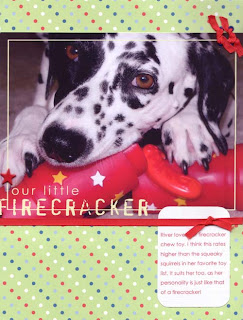

patterned paper: Boxer Scrapbooks Productions, Digital Frame: Suzanne Walker at www.digitalscrapbookplace.com, Ribbon: Boxer Scrapbooks Productions, Eyelets: Boxer Scrapbooks Productions, Font: Century Gothic, Other: Star Brad

For this example layout I first opened my photo, adjusted the levels and curves and sharpened the image. This left me with the basic photo, just of a higher print quality
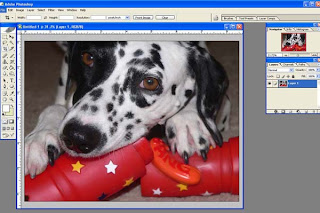


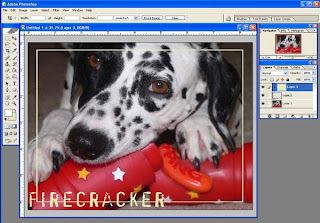
I opened the frame and dragged it on top of my photo, and resized the frame to fit the image. The frame I chose comes with text as part of the image, this makes a perfect title, or subtitle. As you can see the original frame is black, which makes it difficult to see on a black and white subject.
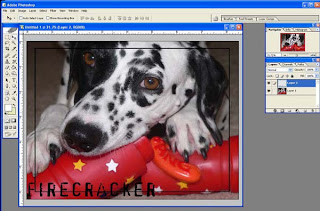

Therefore I decided to recolor the frame. I did this by opening a new layer, and filling the layer with the color of my choice. I decided on a celery green to match the patterned paper I was using.
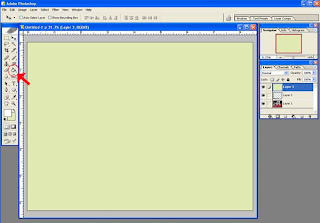


I then clipped the frame and fill layer together using the shortcut “Control G” creating the frame in the celery green color.

Only one more step remained, and that was to add the text “Our little” to complete my title. I chose the same font I would be using for the journaling (Century Gothic) and the same celery green color. Once I was happy with the placement I printed it at home, as a borderless 8.5” width photo. This left the frame text large enough to use as my title!
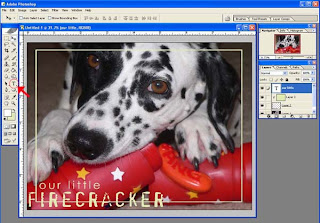

Of course you can either print at home or send the photo's to be printed, making sure you have the photographs at the correct size for processing.

So next time you're sitting at your computer altering photo's for quality, go that extra step! Add some digital frames, title, journaling or word-art to your photographs! You'll be amazed how taking that one extra step really makes your pages POP!


Published in July 2007 Scrapstreet Ezine
all text and images copyright Di Hickman

Read more...

Card Sketch October #4

Wednesday, October 24, 2007

Happy Wednesday!!! It's sketch day again! Parents are here and we're busy catching up. Just popping on to upload the cards and let everyone know we're ok. Fire near us is 80% contained, so that's great news! Digital template can be downloaded here.


This weeks sketch is actually based on these cards I made during my mad Holiday card making phase the other week. I always say I get inspired by lots of things and sometimes the sketch comes first, sometimes the card. This was a card first time. Everything on these cards is from my stash... yes it IS going down I swear!!!

Cardstock: DCWV; PP: Reminisce; Tag: Target


cardstock: DCWV; PP: Reminisce; Ribbon: Joanns; snowflake: unknown


Card by Jo Willis
Supplies: DCWV cardstock, English paper Company papers, Heidi Grace stamps, Lakeland stamps (must have words), KI Memories ribbon, black Bazzill cardstock and my trusty sewing machine


Card by Jolene Johnston
Supplies: Cardstock Warehouse metallic cardstock, Die Cuts With a View Luxury paper, Offray ribbon, JoAnn rub on, StazOn ink, Me and My Big Ideas bling


Card by Pearl Liu
supply list : Bo Bunny Orange Citrus Double Dot Textured double-sided CS, Hip Hip Hooray papers & cardstock stickers, Happy Hammer Birthday Brads


Card by Angela Shetzer
Credits: Christmas kit by Amy Watson


Card by Wendy McGlinchey
Materials used:- White card stock, Patterned paper by DCWV, Joanna Sheen Christmas Bauble stamp from set JS260, Marvy Pens, Versafine ink pad, stickles gold glitter glue, red organza ribbon and gold chord, red 3mm gems.


Card by Cindy Gilchrist
Supplies: K&Company Pattern Papers, Hampton Art Rubber Stamp, Velvet Ribbon (unknown brand), Antique Button, Colorbox Chalk Ink, Bazzill Bazzinks Ink


Card by Cheryl Meehan
Supplies : Stamps by Sassafras Lass, Paper by Shabby Princess


As always hook me up the comments if you do the sketch, and I'll come by and check it out. Can't say for sure WHEN with a busy couple of weeks here in Di-land with my parents visiting. But I will stop by..

Read more...

They just landed!

Tuesday, October 23, 2007

Parents just landed. We have them doing the shuttle from the airport due to the time (flight was brought forward so right in rush hour) and the fires. A lot of road closures and increased traffic. We're ok right now, but brings back memories from 2003 and 2005 when we had it bad here. Hoping that the winds calming down gives the firefighters the break they need to get a grip with controlling this thing.

And just to add a little color to todays post here is the latest copy of Just Cards with a published card from me :) Nice surprise in my mailbox!


Back tomorrow with card sketch, lots of stuff lined up for the blog during my busy time so don't worry normal blogging will commence :)

Read more...