TGIF?

Friday, August 17, 2007

Ok Bob was off yesterday "on call" but back into work today, so now I feel like we had the weekend already and today feels like Monday. Anyway... just sharing a card I whipped up last night. Working on the rest of my cards for 2007. Made a few others but not sharing those yet *wink*. This one is based on an older sketch of mine.

Supplies: Card base: Target; Patterned Paper & Ribbon: DCWV; photo corners: Heidi Swapp; rub-on: scrapease; misc: flower, rhinestone, pen

Still in my "use your stash" phase. Everything on this is OLD. I think the photo corners are the newest thing and they are 10 months old! So yeah, definitely seeing the stash whittling down. I found 8 pre-made 7x5" cards with envelopes in my stash, from Target dollarspot sometime last year. I don't make that size often so it's a bit of a novelty for me.

Trying to share something everyday. Working on a few more projects with the Karen Foster products I have this month. The layout I did sucks, my opinion and you can make your own minds up soon I guess, but sometimes you get a creative block and you just have to work through it. To prove that I just made a hybrid card and love it! Maybe I'm just in a card phase? Yeah that's it! Card phase!

Off to play with some digital this afternoon! Catch you tomorrow!

Read more...

Cardmaking for fun!

Thursday, August 16, 2007

I've been making cards! Mostly stuff for one heart... one mind, but last night I made a couple just to use the left over scraps from the sketch last week. I knew I had enough paper to make another card or two so I made another card using last weeks sketch, and one for next week.


Crazy thing is I still have some of the patterned paper left over (though none of the pink). I go through phases with colors and patterns. Dots are a guaranteed buy for me, love em. Very into the pink and orange too lately. Oh and envelope making. Love having a co-ordinating envelope! I need to get more ric-rac though, ran out of the orange, and only a tiny bit of green left. I am getting a list together of stuff I need to get from the craft store. I know Joanns has a good sale on this week and most of what I need is basics so I'll be stocking up on cardstock, adhesive and seeing what else catches my eye. Plus the LSS is just around the corner so I have to pop in there!

Todays good news is that Cardmaker approved my project and I get to ship it off to them soon (as soon as I finish up the paperwork, urgh!). So look out for me in the May 2008 edition! Can you believe mags work that far ahead? crazy!

Read more...

Card Sketch August #3

Wednesday, August 15, 2007

Happy Wednesday! Yep another week gone by! Wow this summer is flying by huh? Anyways here is this weeks sketch. Something I little different, you gotta think to make this one work for ya! The digital template is available for download here.


Newsletter subscribers will know that I'm currently switching rooms for my creative stuff. Literally just moving one room over, it's so much cooler in there, and tiled floor makes for easier clean up. Anyway as such I've decided I need to start using my supplies more, so more projects to post! As you can see from this project I used papers, cardstock, flowers, buttons, rub-ons, stamps and chalks (on the light pink cardstock, inked in clear and chalked over it). Also made a co-ordinating envelope from the mountain of patterned paper I have.

Supplies: cardstock: DCWV; patterned paper: one heart... one mind; stamp: fiskars; rub-on: DCWV; Chalks: Craf T; other: button, flower, clear ink


The sketch girls did great this week! Definitely got their thinking caps on. So many ways to do this sketch, some did it as is, some turned it. Great color schemes and themes for this one! Always amazes me how versatile one sketch can be. Thanks gals!


Card by Cheryl Meehan
Supplies: All papers from the Autumn Leaves collection, the butterfly is stamped using PaperTrey stamps. Flowers are primas with adhesive gems.


Card by Cindy Glichrist
Supplies: Bazzill Cardstock, K&Company Pattern Papers, K&Company Sentiment, Prima Flower, Buttons & Flower from Craft Supply Store, Colorbox Chalk Ink and Machine Stitching.


Card by Ruth Trice
Supplies: PP and stamps by HOTP, silk flower from a general store and flower punch.


Card by Wendy McGlinchey
Materials Used:- Patterned paper, Tanda Stamps New Home Set 1 (Minis), white and yellow card stock and a flower brad.


Card by Kelli Smith
suppies used: paper by piggy tales (snow white & 7 dwarfs collection), A2Z essential chipboard, pinecone press flower tags, brads


Card by Linda Flinders


Card by Joanne Atkinson
Supplies: all scraps from designers stash


As always hook me up via comments or email if you do the sketch as I love to come check them out! Thanks! And happy cardmaking!

Read more...

New article available!

Tuesday, August 14, 2007

on the Everyday Digital Scrapbooking blog! Go check it out on how to make luggage tags!

Read more...

Hybrid article: June 2007

Hybrid: Opening up a whole new world for traditional scrapbookers.


I thought I'd cheer everybody up and declare at least 50% of you reading this are already using hybrid techniques! How? Well I know from the Scrapstreet gallery that at least 50% of the layouts in there have computer journaling. Yes, hybrid can be that simple! Computer journaling is the simplest technique for using your computer as a tool for your scrapbook projects. Whilst I realize that handwritten journaling is beautiful and such a personal statement, if like me you have messy handwriting it's just not going to be an option. I'd say my paper scrapbook pages feature 95% computer journaling. Unless its a one or two lined piece computer journaling is what I do. I can get the handwritten look with different fonts and still make it nice and neat (unlike my real handwriting!)


For my computer journaling I prefer to use paint shop pro or photoshop. No real difference between using a paint program or a word processing program for this technique, other than personal preference. The only reason I use a paint program rather than a word processing program is incase I decide to use a digital wordart element for a title or journaling accent, or I want to draw a border to add emphasis. For this tutorial I'll use OpenOffice. Why Open Office? Well many reasons, first not everyone has microsoft word, and I want to use a program that is accessible to everyone for the tutorials. Plus Open Office runs on many user systems, including a mac! If those aren't reasons enough then I will add that its a FREE download, just visit www.openoffice.org to download a copy! Although you should be able to replicate the steps using your own paint program or word processing software.


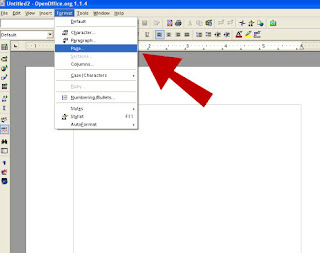
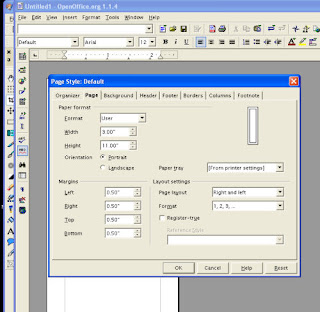
For my 8.5 x 11 layout I needed a journaling panel 3" wide x 11" high so I open a new document, and resize the page to 3" x 11". You'll also note I changed the borders from the default to 0.5" all around.

Then I begin typing my text. Here I can change the font style and size for the whole paragraph, and I can add bolding to the subtitle at the top of the paragraph.
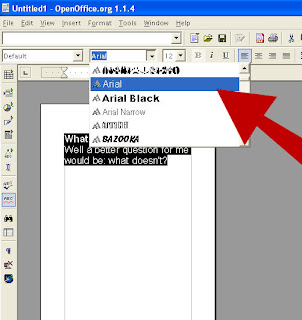
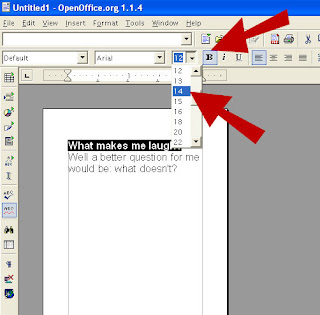

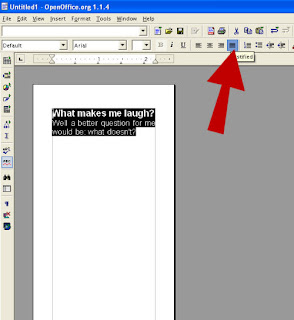
One thing to consider when formatting your text is justification. My personal preference is for fully justified right/left leaving a straight edge on both sides. Full justification adds spaces between the words to widen out the line of text, sometimes this can look odd with big gaps in the journaling block, use your own judgment as to which justification you use for each project. The fully justified selection is the format I used in the final layout.

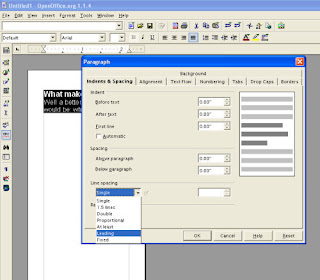
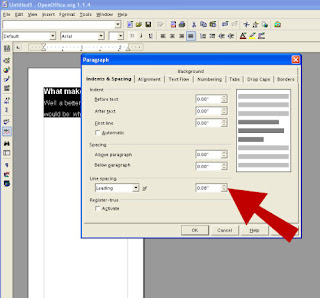
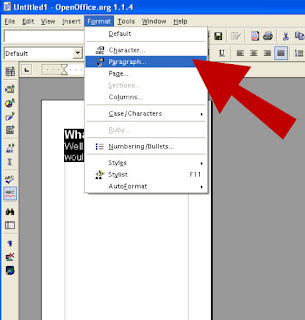
One last thing to consider before printing your journaling is the leading. The leading is the space between the lines of text. Sometimes once the text is printing the lines are so tight together it makes it difficult to read the text. In open office the leading is done by inches, in other programs its done by font size. Play with the figures to get a good space between lines so your journaling is easier on the eyes. Steps to change the leading are shown in the photo's.


One last thing before printing the text... always print onto a regular piece of paper first, and proof read the journaling. Countless times I miss words, or I get carried away in my train of thought that the sentences no longer make any sense! Proof read, correct any grammar or spelling and then print your final piece onto cardstock and assemble your layout as shown in my example below.
Supplies: Paper: Basic Grey, Cardstock: Bazzill; Rub-ons: SEI, Making Memories;
alphabet stickers: American Crafts; Font: Arial.

Read more...

Nothing to see here (edited)

Monday, August 13, 2007

that's my life right now, nothing to see... Almost everything I've been creating is for assignments that I can't share yet. Although that is awesome (and I'm really NOT complaining!) it's bad for the old bloggeroo. I am on the verge of deadlines due Wednesday and naturally true to form we decided to move the rooms around further at the weekend, so right now I am mostly moved into my new scraproom/studio/office. Plus I can't even take pics right now cos the stuff I'm working on is spread out right across the table (and floor and desk but we won't go into that). So I'm going to post a couple of the bloggy questions I've had recently

Secret Crafter asked: I would like to know how you highlight titles (I notice that you have blue boxes around yours) how is this done please?
Answer: You can get this template as a 2 column template in blogger. It's called the "denim" template. The highlighting etc you can alter in the layout once you choose the template.
I just modified the heck out of it to get the 3 columns, and banner, and made it wider.

HappyHappyJoyJoy asked: is it really that hard to make a three column blog? Are you sure you don't want to share how? Please!!
Answer: If you just want a 3 column template then google "3 template blogger" and you should get some links for templates. Unfortunately I'm picky. I liked the standard layout I had, just wanted 3 columns. I also couldn't find a template to use that had the 3 columns, plus the archieves how I liked them (collapsable) and the labels, and, and, and... Yeah I'm picky. So yes I took an afternoon, swore a lot, and vowed NEVER to touch the html to the blog again. (which I promptly broke last week when I put the new banner in). So never say never eh?

Chris asked:
I would love to put a photo show down the side of my blog so if you have any clues I would be so grateful. I have tried before but the slideshow is always too wide and I have no idea how to resize it. oooooh tall order there lol
Answer: I'm looking into a tutorial on this soon, keep ya posted!

Jan asked about the brush tutorial: Do I have to use this in photshop? I usually remove my card stuff to Microsoft something or other because I am not editing them. HOw would I use a copyright in a simpler program or do i need to fold them back into a photshop folder and add it there and then back to the simple one?

Answer: without knowing the microsoft program you're using I don't know. Email me with your program specs and I'll hook you up to a tutorial. I use photoshop to resize my pics for the web so it's just another step to add the 'watermark' before saving. I know you can do the same in paint shop pro. Even just a little text with your name or blog would help too.

Jan also asked: I want to make my own head banner and am playing around a bit. how easy or hard is it? and this may be really dumb-but can I make it animated at all?
Answer: For me it was easy to make the banner. Guess it really depends on your paint package knowledge? And putting it into blogger wasn't that hard. I will say it depends on blogger most times, sometimes it's a little 'temperamental'. Some people go to remove their header in the layout and find they can't, so there may be some html altering involved. To make an animated image you need an animatation program, saving the image as an animated gif file. I would imagine blogger allows animated banners but I can't say I've seen any. Maybe I'll try it and let your know? lol.

Ok anymore questions just ask, about anything I don't care, I'll help if I can. I gotta go finish up the assignment, so far I've done the cover of a mini book. That took me an hour! Not feeling particularly productive apparently!


Edited: -
And cos I can't post lately without a pic at all here is a digi layout I did with the free kit for scrapstreets July issue. I found something to share! YAY! More soon!


Credits: Fiesta Fourth by Dora Phillips and Michelle "Spink" Boeckermann for ScrapStreet.com; Font: century gothic.

Read more...

in the midst of a pile of paper

Saturday, August 11, 2007

That's me! Playing with paper this weekend. I got my altered projects finished and photographed this morning, and I just emailed the jpgs off. My first time doing photo's as I go for a step-by-step so hopefully they'll pass "inspection", lol. Next up is more paper and this one is a few items rolled into one assignment. I cleared off my table from the altered stuff, and got out the formality papers I need to use.

Ok, as I don't seem able to post lately without pictures I thought I'd post some photo's I took a couple of weeks ago. This is Sky chewing on an empty ribbon spool. Yep she's crazy. For some reason she gravitates to weird objects to chew on. Her strangest is sandpaper, can't leave that anywhere she can grab it!


And no she doesn't usually eat the bits! At least very rarely. It's a destruction habit. She never does this with things she isn't allowed either (except sandpaper, guess the gritty goodness is too much?) mostly cos she is terrified of doing anything wrong, and is a complete nervous Nelly. Anyway I figured my family would at least get a laugh out of these.

Read more...